
Master your server! Our definitive guide shows you how to install PHP code on cPanel step-by-step. Learn file management, version control, and security best practices.
There’s a unique thrill that comes with bringing a PHP project to life. You’ve poured hours into writing elegant code, debugging frustrating errors, and finally, you have a script ready for the world to see. But then comes the moment of truth: moving it from the safety of your local machine to the vastness of the live web. For many, this is where the anxiety sets in.
If you’re staring at your cPanel dashboard wondering, “What now?”—breathe. You’re not alone. Installing PHP code on a server is a fundamental rite of passage for developers and website owners alike. While it might seem daunting, cPanel, the world’s most popular web hosting control panel, is designed to make this process surprisingly straightforward.
This guide is more than just a list of steps. We’ll walk through the process together, I’ll share some hard-earned wisdom from my own experiences, and we’ll ensure your code isn’t just installed, but is also secure and running optimally. Let’s demystify the process and get your project online.
Before You Begin: The Essential Pre-Flight Checklist
Rushing to upload files is a recipe for headaches. A few minutes of preparation can save you hours of troubleshooting.
- Gather Your Credentials: Ensure you have your cPanel login URL, username, and password. Your hosting provider typically emails this to you upon signup.
- Have Your Files Ready: Organize your PHP code files on your computer. Know which file is your main entry point (e.g.,
index.php,login.php). - Understand Your Requirements: Does your script require a specific PHP version? Does it need a database (like MySQL)? If so, have the database name, user, and password handy. You can often check this in a
readmefile or the documentation of the script you’re installing.
Your Launchpad: A Quick Tour of the cPanel Interface
Log into your cPanel. The interface can look busy, but focus on two critical sections under the “Files” category:
- File Manager: This is your in-browser FTP client. It’s where you’ll upload, delete, and manage your files.
- MySQL® Databases: If your project needs a database, you’ll create it here.
For now, let’s focus on the files.
Step-by-Step: Installing Your PHP Code via File Manager
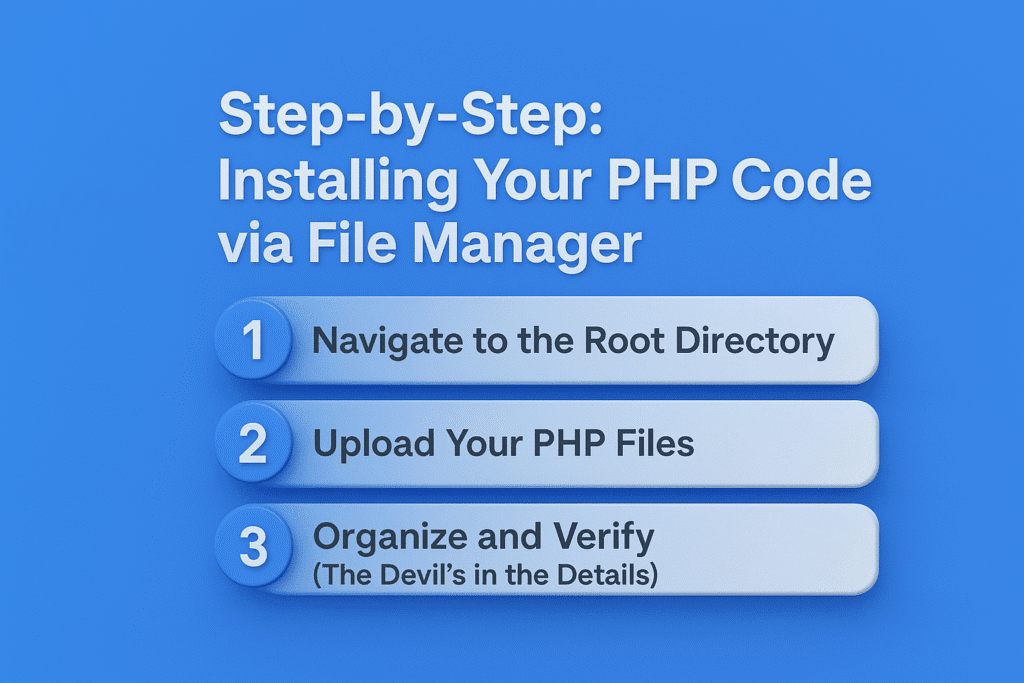
The cPanel File Manager is the most direct way to get your files onto the server. Follow these steps closely.
Step 1: Navigate to the Root Directory
- Open the File Manager.
- On the left, you’ll see a file tree. You need to navigate to your website’s root directory. This is the folder where your website’s main files live. It’s often called:
public_htmlwww- or sometimes a custom name for your domain (e.g.,
yourdomain.com).
public_htmlis the standard for your primary domain. If you’re adding a script to an addon domain or subdomain, it will have its own folder (e.g.,public_html/subdomainorpublic_html/addondomain).
Step 2: Upload Your PHP Files
- Once inside the correct directory, click the Upload button in the top toolbar.
- A new window/tab will open. Click “Select File” and choose the PHP code files from your computer. You can select multiple files or even entire folders by holding
Ctrl(orCmdon Mac) while clicking. - Wait for the upload progress bars to complete. Once done, close the upload tab and return to the File Manager.A Common Pitfall & Better Alternative: Uploading dozens of files individually through the browser can be slow and unreliable. For larger projects (like a WordPress site), it’s often better to compress your files into a
.ziparchive, upload that single file, and then use File Manager’s “Extract” feature to unzip it on the server. This is faster and preserves directory structures.
Step 3: Organize and Verify (The Devil’s in the Details)
- Back in File Manager, ensure all your files have arrived correctly. Are they in the right place? For example, if your main file is
index.php, it should be directly inpublic_html, not buried inside another folder unless that was your intention. - Critical Security Check: Look for any
installorsetupdirectories. These are common in applications like WordPress or custom CMSs. Once you’ve run the installation, you should delete these folders. They can be a massive security risk if left on the server, as they could allow an attacker to re-run the setup and hijack your site.
Step 4: Set the Correct File Permissions
File permissions control who can read, write, or execute a file. Incorrect permissions are a common source of errors.
- 644 for most files: This is the standard for
.php,.html,.css, and.jsfiles. It means the owner can read/write, and everyone else can only read. - 755 for directories: This allows your web server to access and read the contents of the folders.
- Sometimes 775 for writable folders: If a folder needs to be written to by the script (e.g., an
uploads/folder), you might need to set its permissions to775.
To change permissions, right-click a file or folder, select “Change Permissions,” and set the numeric value.
Beyond the Basics: Pro Tips for a Smooth Installation
Anyone can upload a file. A pro ensures it runs flawlessly.
1. Taming the PHP Version
Not all PHP code is created equal. Older scripts might break on new versions, and newer scripts might require features from modern versions. cPanel gives you control.
- Find the Select PHP Version tool (often in the “Software” section).
- Here, you can choose your preferred PHP version from a dropdown. The PHP manual is your best friend for understanding version differences.
- You can also toggle individual PHP extensions (like
curl,gd,mysqli). If your script reports an error about a missing extension, this is the place where you can enable it.
| PHP Version | Status | Recommended Use |
|---|---|---|
| 8.2+ | Active, Stable | New Projects. Offers significant performance and security improvements. |
| 8.1 / 8.0 | Security Support Only | Maintaining older projects. Stable but only receiving security patches. |
| 7.4 | End-of-Life | Avoid. No longer supported! A critical security risk. |
2. The Database Tango
If your script needs a database, the process is:
- Create a Database: Go to MySQL® Databases, give it a name (often prefixed with your cPanel username), and click “Create Database.”
- Create a User: Scroll down, create a new user with a strong password. Use the password generator!
- Add User to Database: Link the user to the database and assign ALL PRIVILEGES (for installation).
- Run the Installer: Now, visit your website’s URL in a browser. If your script has a web-based installer (like most CMSs), it should launch. You will provide the database details you just created.
3. The Power of SSH and Git (For the Adventurous)
While File Manager is great for beginners, advanced users often use SSH (Secure Shell) and Git. Using ssh and command-line tools like git clone or rsync is exponentially faster for deploying large codebases and is the standard practice in professional development workflows. If your host offers SSH access, it’s worth learning.
Troubleshooting Common Hiccups
- “500 Internal Server Error”: This is a generic error. Check your file permissions first. Then, look in cPanel’s Error Log (under “Metrics”) for a specific clue.
- “404 Not Found”: Your file doesn’t exist at that URL. Double-check the file path and name.
- White Screen of Death: Usually a fatal PHP error. Enable error reporting by adding
ini_set('display_errors', 1); error_reporting(E_ALL);to the top of your main.phpfile (remember to remove this after debugging!).
Conclusion: You’re Live!
Installing PHP code on cPanel is a skill that unlocks endless possibilities. From a simple contact form to a complex web application, the process remains fundamentally the same: prepare, upload, configure, and test. You’ve now moved from seeing cPanel as a confusing dashboard to recognizing it as a powerful tool kit for managing your corner of the internet.
The journey doesn’t end here. Always keep security at the forefront—update your scripts, use strong passwords, and remove unnecessary files.
I’d love to hear from you! What project are you deploying? Did you run into any unique challenges during your installation? Share your experiences and questions in the comments below—let’s learn from each other. And if you’re looking to deepen your understanding, check out our guide on securing your WordPress installation next. Happy coding
